Gluten Free Chocolate Tarts with Chocolate-Hazelnut Mousse

I will make no apologies for the decadence of this recipe. Sometimes, baking needs to be an out-and-out splurge – even gluten-free baking. (Calories don’t count on Valentine’s Day, right?)
I just adore the combination of hazelnut and chocolate.: chocolate hazelnut spreads, Baci® chocolates, anything that combines the sweet nuttiness of hazelnut with dark, rich chocolate. . . I can’t resist it. I’ve tried.

These crumbly, melt-in-your-mouth dark chocolate tart shells are a great way to make the most of the naturally delicate texture of Hodgson Mill Gluten Free Baking Flour, and gluten free flours in general. It’s usually gluten’s job, however, to help all the ingredients come together easily. So in the absence of gluten, I’m adding Hodgson Mill Xanthan Gum to this recipe, which will act as a binder. (Kudos to Hodgson Mill’s awesome customer service team for answering my call with this stellar suggestion.)

This recipe starts almost the same as any other pastry recipe; mix up the dry ingredients and cut in plenty of fresh, cold butter until the mixture resembles bread crumbs. Then add eggs to help bind the dough and make it even richer. (I’m already dreaming of making this crust again for dark chocolate-strawberry pies.)
I tried a cool new method of working with pastry. (Well, it’s new to me, anyway.) No rolling out or transferring like you do with a typical pie crust, which would be very difficult with this fragile dough. Instead, you freeze the dough until it’s solid and grate it into fine crumbs on a box grater.

It’s a little easier to see in the pictures below, as I was working with the bigger tart pan. Press down the pile of crumbs, starting in the middle, and continue pressing and coaxing it out out onto the walls of the pan.

Smooth out the surface of the dough, pressing and sculpting until it’s evenly distributed all around. Be careful not to let too much gather in the corners – it’s easy to get thick ‘baseboards’ of dough, but just press it a little further up the walls to even out the thickness.
Then prick the bottom of the pastry with a fork to prevent it from bubbling up. (You can see in the right photo, below, I didn’t prick the bottoms of this batch quite enough – a few tartlets bubbled anyway.) After a quick bake in the oven, they’ll come out looking and feeling slightly dry. The dough might pull away from the walls of the larger pan, but this is fine.

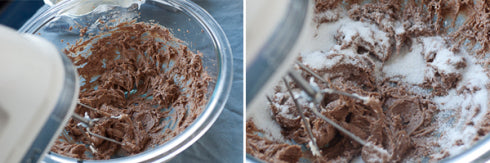
As the tart shells are cooling, it’s time to make the filling. Whip together the chocolate hazelnut spread, cream cheese, and butter with an electric mixer.

Add the sugar, beat again until it’s fluffy, and then beat in the vanilla.

One note: I used Justin’s® brand chocolate hazelnut spread, which I started buying because it has a little less sugar than Nutella®, and I very much liked the results! I think if I had used Nutella®, which uses more finely ground hazelnuts; the mousse might be a little smoother and fluffier. That will be another delicious experiment.
In another large bowl, whip up the cream until soft peaks form. Fold the whipped cream into the chocolate-hazelnut cream cheese mixture, and then you’re ready to fill the cooled tart shells. (Make sure you remove the tarts from their pans before filling.) You can spoon the mousse and spread it to the edges of the tart with a spoon or knife, or if you’re feeling really fancy, you can spoon the mousse into a plastic bag and snip off a corner to pipe it in in a spiral.

The garnishing is really fun – pile on the chocolate shavings, hazelnut halves, and a little dollop of raspberry jam – go nuts.
Whew! Congratulations! Completing a three-step recipe deserves a little celebration. (I recommend immediately eating any that broke or didn’t turn out quite as pretty as you might wish.)

I hope you have a wonderful Valentine’s Day, everybody!
Gluten Free Chocolate Tarts with Chocolate-Hazelnut Mousse
Crust
1 ¼ cup Hodgson Mill Gluten Free Baking Flour
¾ teaspoon Hodgson Mill Xanthan Gum
¼ cup unsweetened cocoa powder
2 Tablespoons instant espresso powder
8 ounces cold butter (1 stick) cut into small pieces
¼ cup sugar
¼ teaspoon salt
2 eggs, lightly beaten
Mousse
½ cup chocolate hazelnut spread, such as Justin’s® or Nutella®
½ cup cream cheese, softened
2 Tablespoons unsalted butter, softened
¼ cup granulated sugar
½ teaspoon vanilla extract
½ cup whipping cream
Toppings
Raspberry jam
Chocolate shavings
Hazelnuts
To make crust, combine dry ingredients in a large bowl. Cut in butter until mixture resembles coarse bread crumbs. Add eggs and mix well with a fork until evenly moistened and crumbs stick together when pressed. Divide into two equal balls, wrap each tightly in plastic wrap, flatten slightly, and put in freezer for 1-2 hours.
When dough is frozen solid, grate it into fine crumbs using a box grater. Coat tart pans with nonstick spray or butter. Press crumbs evenly, approximately ½-inch thick, into six 5-or 6-inch tart pans with removable bottom, or 12 individual tart pans. Smooth crust edges and be sure to press dough out of corners of the pan.
Prick tart bottoms all over with a fork. Bake for 18-20 minutes, or until dough looks and feels slightly dry. If you are using larger 5-or 6-inch tart pans, the edges of the dough may start to come away from walls of pan. Cool tart shells completely, and remove from pans.
To make filling, use an electric mixer on high speed to cream chocolate hazelnut spread, cream cheese and butter. Slowly add sugar and beat until fluffy. Beat in vanilla. In another bowl, beat whipping cream until soft peaks form. Gently mix the whipped cream into chocolate-hazelnut cream cheese mixture.
Fill tart cups two-thirds full. Spoon the mousse into the tart and smooth it with spoon or knife, or pipe the mousse into the tart using a pastry bag or plastic bag with one corner removed. Cover tarts loosely with plastic wrap and refrigerate at least 1 hour. Garnish as desired with 1/2 teaspoon raspberry jam, preferably seedless, dark chocolate shavings, hazelnut halves, etc.
Notes: makes six 5-6-inch tarts or 12 individual 2-inch tartlets. Keep refrigerated. Keeps up to 3-4 days refrigerated in sealed container.
Substitutions: Feel free to use any other nut butter instead of chocolate hazelnut. Peanut butter works very well, too.
